

Welcome! Thank you for checking out my first post on Jonathon C Photography! In my posts, I hope to accomplish a number of things. In some, I will share my techniques and processes as a photographer. In others, I will write about and share shots from some of my favourite places. My ultimate goal is to inspire you to engage with my posts through creative discussion or the sharing of ideas, techniques and work.
Let’s get started!
MY CREATIVE PROCESS
I always have a plan when I shoot and often start with a specific image in mind that I want to create. The concept of this final image inspires my overall strategy, which can start with something as simple as going to a subway platform on a Sunday morning. With my first series of posts, I will share an example of this process.
THE FINAL PRODUCT
This is the shot I wanted. How did I achieve it?

FROM CONCEPT to LOCATION
We have all seen many great subway shots, but I want to create something that stands out from the rest. My vision is a long platform stretching far into the distance as trains rush past on each side. I also want to leverage symmetrical lines in a black and white photo against a splash of colour to emphasize both depth and motion.


To bring my idea to life, I have one particular subway platform in mind – Museum Station outside the Royal Ontario Museum in Toronto. It has the right platform design, but also that little something extra: it is the only station in Toronto where the columns are designed to resemble actual museum exhibits.


EQUIPMENT, SET UP & COMPOSITION
I will not need anything complicated for this shoot, only my camera, wide-angle and tripod. I briefly consider a neutral density filter but decide against it because the station lighting will allow me to capture motion using just on-camera settings.
After arriving at the station, setting up and taking a few test shots, I consider where to best position my camera to capture the images I need.
Shooting on a Sunday morning is advantageous because it minimizes pedestrian traffic. However, it also means fewer trains are running, so capturing two moving through the station simultaneously will likely not be possible. Fortunately, I have an easy solution for this – blending different pictures together!


Therefore, I need virtually identical shots of the station, but with trains on different sides. Ideally, I don’t want to move the camera between shots, so I decide on a central location at one end of the platform with views of both tracks.
SETTINGS
My wide angle has a focal length of 10-20mm. There is noticeable distortion / blurring around the edges when it’s wide open, so I rarely do that.
To capture motion I use a slower shutter speed. As a result, I must adjust my ISO and F number to compensate. I also like to shoot a tad dark and adjust when editing. My final settings reflect all of these factors.
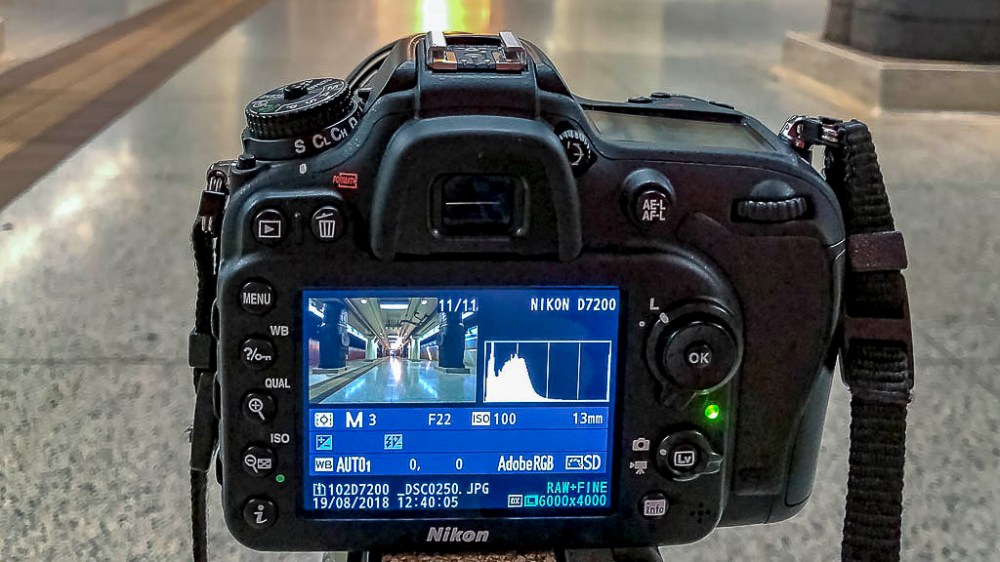
Focal Length: 13 mm
ISO: 100
F Number: 22
Shutter Speed: 3 seconds
CHOOSING THE RIGHT SHOTS
After some time and a lot of patience, I have the shots I need to work with. Here are 6 possible images I could blend together:
3 with trains on the left:


3 with trains on the right:


Now, there’s just the simple tasks of choosing the right shots, blending and editing!
In my next post in this series, I will reveal which 2 shots I chose and go through my 8-step process for creating a blended image.
Until then, I’d love to hear from you! Did you find this interesting? Useful? Please share your thoughts and what you liked about it!
ALSO: Please visit Jonathon C Photography later this week to see my first post in a “Where To” series about a place in Toronto I love to visit and shoot! Can you guess where?
Don’t forget to click like and recommend Jonathon C Photography to your friends or anyone you know who may find it interesting.
Finally, please follow jonathoncphotography.com so you can always be first to hear about all the new content that I post!

[…] Previously, with “How I Got Here“, I shared my initial steps in bringing an image concept to life. In this post, I will […]
LikeLike
[…] created my subway image, focusing on my Lightroom editing process. If you haven’t read the first or second post, please take a […]
LikeLike
[…] my subway image, focusing on applying individual adjustments. If you haven’t read the first second or third posts, please take a […]
LikeLike
[…] to my next “How To” series of blogs. In the previous series, I shared aspects of my creative process as well as a few of my editing techniques. This series […]
LikeLike
[…] demonstrate how to create a beautiful urban landscape image from a unique point of view. As with previous posts, my hope is to inspire and create discussion and I look forward to hearing about your […]
LikeLike